Sizing your image file in Photoshop
Metroprint is a professional online printing service that allows you to upload files already resized to your chosen print dimensions, select a pre-set size, or input your own custom size. You can read more about this here.
This tutorial shows you how to use resampling to preserve the data (MB) in your file whilst setting the correct (cm or inches) size for printing. If you would like to understand more about the terms used in describing the process, they are explained at the end.
The trick to getting a good quality print is to make sure you don’t unneccessarily lose quality when you change your document size to a print size. A loss of pixels, would mean lower resolution, which is image quality. But here’s the rub: each printer has its own resolution and you cannot exceed or be less than this. So your file should be the correct resolution, at your chosen width and height. The correct resolution also comes in to play with getting the borders you want so it’s useful to learn as much as possible about how to keep your files in line with the printer settings.
1. So firstly, to find out the right resolution for your print type (size, paper,type) always use the technical help calculator.
2. The calculator will tell you the right resolution (dpi) for your chosen print type (e.g C Type, Giclée, black and white) and size (different printers are set up for specific sizes, for example the Lambda is 200dpi, the Lightjet 300dpi). Now you know the correct resolution, you can set your document size to your chosen width and height.
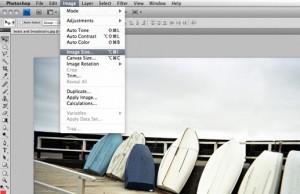
3. Go to Image> Image size
4. Make sure that Constrain Proportions is checked.
5. Uncheck Resample Image. The ticks to the right shows that width, height and resolution are now linked.
6. Keep an eye on the Pixel Dimensions (16.3M in this example) you will notice that now they remain constant when you adjust the width and height. If you add extra (cm) size, the resolution (pixel/inch) will go down, if you remove (cm) size, your resolution will go up.
7. In this illustration I have taken the size down to 6 inches and the resolution has gone up to 418 ppi. This is over the correct resolution for a Giclée print which is 300dpi.
8. So set your (cm or inches) document size, and observe the resolution. If the resolution is over or under the correct resolution go to stage 5. NB: When using this method you should set the resolution first and the image size second. Check the Resample Image. Now the link symbol will return to just width and height.
9. Change the resolution for your print type to the correct resolution given by the technical help calculator.
10. In this example, I have changed the resolution to 300dpi. You will notice that the pixel dimensions have gone down from 16.3Mb to 8.38Mb. This is because my file was too big for my desired print size. Photoshop is using resampling (in this case, resampling down) to take away unnecessary pixels. This will make upload time quicker and my file easier for the printer to handle.
11. If your resolution is lower than the correct resolution for your print type, you have two choices: either add in pixels at this stage by using resampling (up) or make a smaller print and keep within the limitations of your file.
12. Having set up your preferred width and height at the correct resolution for your media type, you can now set up custom borders in Photoshop.
Photo Printing
Prints ready for collection within 24 hours, or for delivery worldwide. We can produce prints in sizes from a simple 6×4 up to 2.74m x 1.22m / 108 x 48 inches, giving you a huge choice of sizes when it comes to producing your prints.
Fine Art Giclee printing
While all of our colour and black and white photo printing services are of gallery quality, a lot of photographers and artists like to produce their fine art prints on Giclee watercolour paper, using archival pigment inks.
Black & White printing
We can produce real Silver Gelatin 'Darkroom prints' from your digital files. Working with Ilford, we are able to print directly to Ilford Galerie Silver FB Glossy fibre based bromide photo paper and Ilford Galerie Digital Silver RC Pearl.
Mounting your prints
After your photos have been printed, our mounting team are able to mount the prints on a range of substrates, ranging from the lightweight foamex, foamboard or kapamount. We can also mount ctype photo prints onto more sturdy materials such as dibond or aluminium, backed with either battens or a subframe, depending on print size.
Framing your photos
When ordering online, we offer a limited range of classic photo frames, in three finishes: white photo frame, smooth black photo frame or a solid light oak frame. Alternately, just order your prints online to take advantage of our great value online ordering system, then contact us to discuss alternate framing styles and our range of thousands of frame mouldings.